Starting a Game
A game of Ophir 2D can be created ad-hoc from the /lobby page (log in required).
The Navbar
The game-specific navbar contains these buttons:
- returns to the Lobby. The game will persist and you will be able to rejoin it.
- transitions to the next game phase. Only available to the game owner throughout the Color Selection and Specialist Drafting phases.
- reverts the game to the Color Selection phase. Only available to the game owner.
Color Selection
The game owner
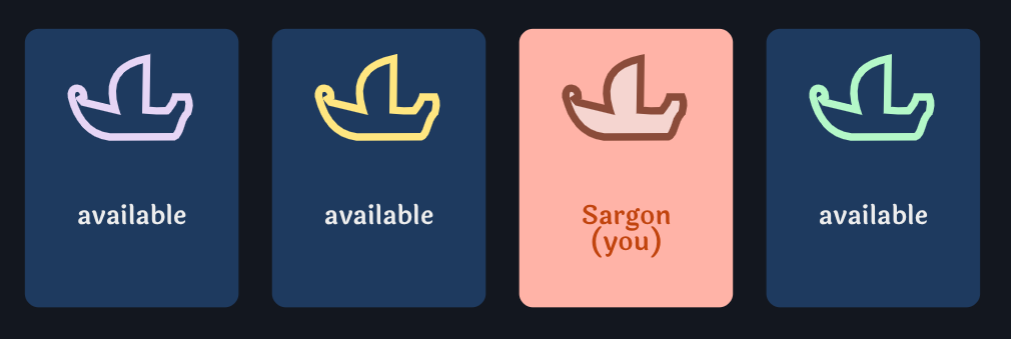
During Color Selection visitors may join by select one of the available colors. This is a free-for-all phase. A player may still select a different color if and when available. The first visitor to become a player is also the game owner. The game owner may click on at any time to clear the entire session and begin anew.
Adoption
If all players leave during this phase, the game is labelled as "Abandoned". An abandoned game will be adopted automatically by the first returning player or by the first visitor who joins/selects a color.
Deletion
Games that have no players and no visitors are deleted automatically. Games that have passed Color Selection will also be deleted if they register no activity for a long time (usually 36 hours).
Once you've chosen a color, you can start typing in the included chat. As a special command, you can
currently change your display name by typing #name <some_name>. You can do this any time
during the game except after its conclusion.
When the owner is satisfied with the player composition, he or she may click on . This will transition the game to the Specialist Drafting phase.
Specialist Drafting
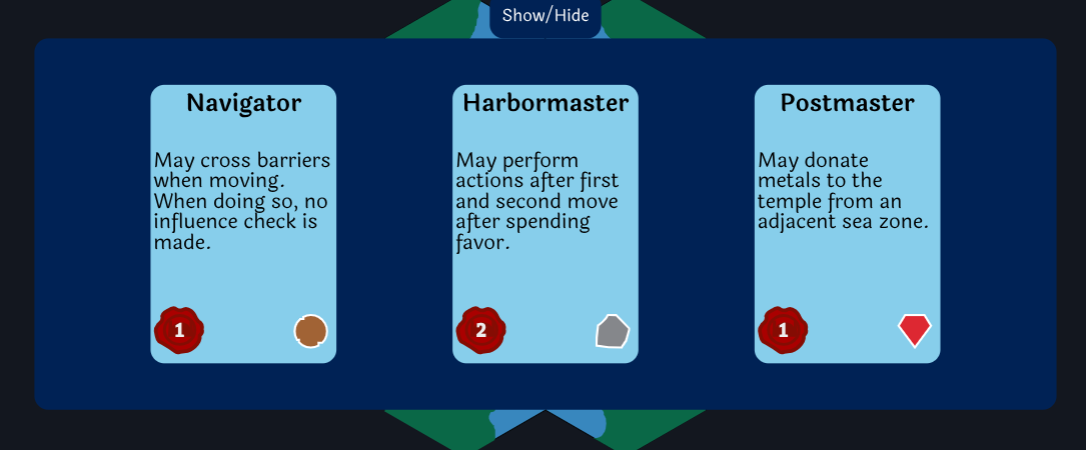
In this phase players will have to select a specialist to carry into the Play phase. Each specialist provides:
- A unique advantage in trade, donations, movement, or capacity.
- Some starting favor (
).
- Usually, a specialty (affinity for selling one of
).
Clicking the Show/Hide label will hide the panel and reveal the game's locations and barriers placement. It's useful to examine the layout before choosing your specialist.
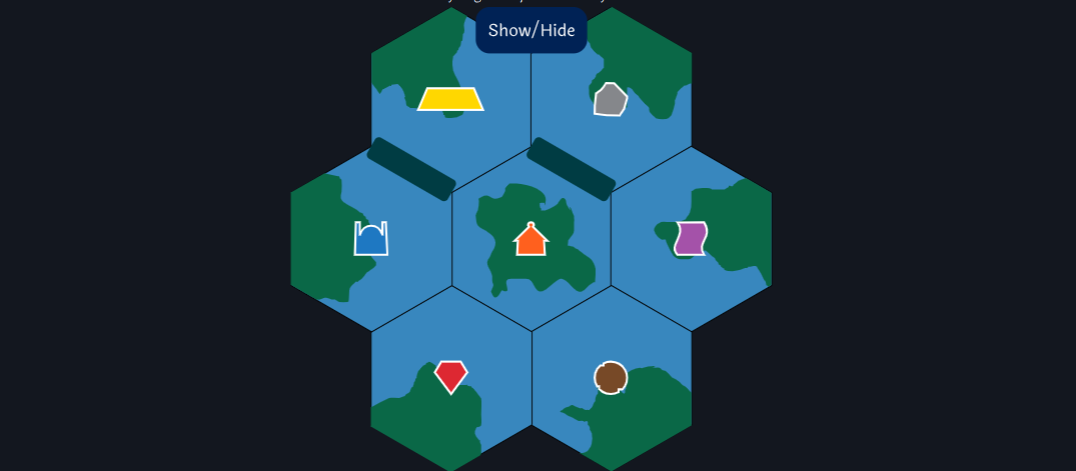
Each of the two grey barriers is blocking access between two zones. The separated zones are not adjacent.
Each zone containins a unique location. During the game, after moving to a location, you will be able to perform its specific actions. Here's an overview:
- There are four commodity locations:
- The mines provide gems (
).
- The quary provides marble (
).
- The farms provide linen (
).
- The forest provides ebony (
).
- The market (
) buys
in various assortments, providing coins (
) in return.
- The treasury (
) requires payments of
to provide gold (
) and silver (
). It also accepts
as payment.
- The temple (
) receives donations of
&
, awarding victory points (
). It also accepts
assortments in exchange for some
&
.
Specialist selection is done in a randomized order. Available specialist cards will lighten up when it's your turn to pick. Once you've clicked a specialist card, you'll have to click on it again to select it. You can't change your mind after that.
When all players have selected a card, the owner may click on to start the game.
Play
Note: The at-location temple icon is depicted differently during the game. It reflects it being constructed as players donate metals.
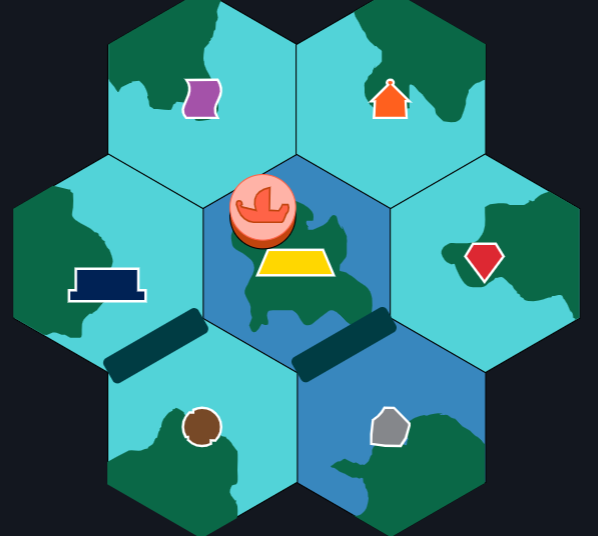
Upon starting, your ship will appear in the map's center zone as a disc token in your chosen color. The token is draggable and it is used to indicate your current location on the map. It's actual position is irrelevant as long as it is within the zone's hexagonal boundaries.
Your goal is to donate as much as possible to the before the game
ends.
- Donating
awards 10
.
- Donating
awards 5
.
- Trading
awards 1-4
.
When the game is over, onboard and
are still
worth 5
and 3
respectively.
Finally, ties are broken by remaining then
. Further ties result in a shared victory.
The Play Space
The Interface
Around the map you have four icons/buttons relevant to you in relation to the current turn:
1. The moves counter shows your remaining moves.
2. The favor button may be clicked to obtain turn privileges at the expense of 1
. It becomes checked when clicked to show that you've enabled it.
3. The end turn button must be clicked to end/pass the turn. It appears red and slanted if you still have obligatory things to do.
4. The undo button may be clicked to revert actions and movements.
Since the Market, Treasury
, and Temple
have more complex interactions, each has a dedicated area on
the screen:
Player Area: To the right of the map, you have the player cards. Each card displays:
- the player's influence swatch (a die face situated left of the card itself)
- the player's cargo capacity and contents (a dark band with a thin red border)
- the player's specialist info button (a clickable white/black band that switches to a description of the chosen specialist)
- the player's favor and coins swatches (red seal and silver coin icons depicting how much the player has of each)
- the VP swatch (a victory icon showing your accumulated VP; Appears on your card only)
- the specialty icon/button (displays the specialty associated with the player's chosen specialist; Clickable on your card only)
The following is a detailed explanation of the rules and gameplay.
Turns
Starting with the first player, players will take turns moving and taking actions around the map until the end of the game.
To pass the turn, you must click the end turn button. The button becomes available as soon as you move or spend favor. Your turn can also end abruptly after failing an influence check or if you become idle and play companions decide to skip you.
You can undo your movements and actions up until any unrevertible action/movement that involved rolling a die or revealing a new market card.
Any action that cannot be undone will have to be confirmed in a dialog first. The green button will always submit an action while the white button will only dismiss the dialog.
Game End
The game can end in two ways:
1. The market deck empties and can no longer supply a full set of trades.
In the image below, the top card (1 wood for 2 coins) of the market deck is the last one. The label "0(B)" means "Deck B is in play and there are 0 cards left." The game will end when another card would be otherwise revealed.
2. The temple receives enough gold and silver donations to complete construction.
In the image above, the donations reference area shows that one more metal donation is required for the temple completion. As soon as a player delivers gold or silver, the game will end.
Coins
Coins (appears as a silver coin icon with a value) are the standard currency in the game and are involved in most transactions.
Favor
Favor (red seal icon with a value) is a special currency. You can spend it to enable actions and facilitate movement, among other things. Favor is harder to obtain than coins.
Zone Actions
Each of the seven zones features a specific set of actions that players can take when visiting them. While some are repeatable, most are limited (can only be taken once per turn). By default, you cannot take the actions of the zone in which you begin your turn.
Favor and Actions
At the start of your turn, you may click once on the favor button to spend 1 favor and gain access to the zone's actions. Some specialists benefit more from this.
Moves
You always get 2 moves at the beginning of your turn. You spend them by moving into adjacent zones.
Moving the Ship
On your turn, you may move (or attempt to move) up to two times into zones that are highlighted in light blue.
You move by dragging and releasing the ship figure onto an adjacent zone. Zones that contain other ship tokens are not guaranteed to be accessible. When hovering your ship token over such a zone, it's color will change depending on how probable it is for you to succesfully move.
When you drop your token into such a zone, a dialog will inform you of your chances and ask for confirmation on rolling your influence die. Your chances depend on the player with the highest influence that has her ship token there.
Confirming your attempt will still spend a move, then:
- a) If your rolled influence value is at least equal to the highest influence there, your move is succesful.
- b) If not, you will remain in the same zone, but all players in that zone who's influence matches the threshold will have thier influence value reduced by one.
Failing a roll always costs you the move, but if you run out of moves as the result of a failure, your turn will end automatically. Always consider this when making your second move (unless the threshhold value is 1, of course).
You can always examine everyone's influence by looking at the die face next to their player card.
Favor and Movement
On your turn, as long as you have moves left, you may click once on the favor button to spend one favor and ignore the presence of other ships during movement. With favor spent, you can move into occupied zones successfully, without making influence checks.
Actions and Movement
Whenever you perform a zone action, you lose all your remaining moves. This means that actions never precede movement, even after spending favor.
The Cargo
Your ship has a cargo capacity of 2 spaces (displayed as a horizontal band on your player card), which can hold a single metal or up to two commodities. Players can expand the capacity twice when visiting the temple. On your turn, you can click on any item displayed on your cargo band to drop it overboard. You can drop as many items as you want and whenever you want.
While you wouldn't want to drop anything generally, sometimes the contextual value of commodities can change. What's more, action buttons whose effect would bring a new item onboard are disabled if there isn't enough room. Remember, gold and silver take up two spaces.
Zone Actions
commodity Zones
Four of the seven zones contain commodities (gems, ebony, marble, or linen). Each one enables the following limited action:
Action: Load commodity: Click on the zone's commodity icon to pick up 1 of that type. The item is placed in your cargo hold and is reflected on your cargo band.
Occasionally, a zone may become depleted of commodities (showing a red X). This occurs when all commodities of that type have been picked up. However, the action becomes available again as soon as one of those commodities is returned to the 'bank' (through selling or dropping).
The supply of each commodity is equivalent to the number of players plus one.
The Market Zone
The market (orange house icon) provides you with an limited action (Sell Commodities) and one repeatable action (Sell Specialty Commodity).
The location provides access to the market cards (buttons), featured in the top left of the map, which are splayed right from the market deck, the latter showing the future market card.
Market Card Anatomy
An assortment of commodities and a coin value is displayed in the center. These depict an exact transaction that a player can make.
The small icon with a number on the bottom right shows the card's potential value in VP and Favor as a temple donation.
A small arrow in the bottom left corner signifies that the standard coin value has been modified. The upwards green arrow means +1 value and the downwards red arrow -1 value, respectively. These two modifiers are assigned randomly to the three market slots at the start of the game and are not linked to the market cards themselves.
Market Zone Actions
Action: Sell commodities: Once per turn, you may click on an available market card to remove the required commodities from your cargo and receive the amount of coins depicted. After the transaction completes, the market cards will shift rightwards like so:
- The rightmost card is discarded.
- The other two cards shift one slot to the right, losing and/or taking on a new coin value modifier.
- The top card of the market deck becomes available in the first slot.
- A new card is revealed on top of the market deck.
Action: Sell Specialty: Click on the specialty icon located on your player card to sell one commodity of that type from your cargo and receive 1 coin. You may repeat this as long as you have commodities of that type in your cargo.
Important to note:
- A market card is only discarded if it's the rightmost one during the market shift, not because a player clicked on it.
- The market deck has the letter "A" displayed near the bottom left. This means that it's topped with "A" cards. When enough cards have been drawn, the "A" will change to a "B". This means that better deals will start popping up.
- A consistent market shift due to the Sell commodities action will eventually drain the deck, which will end the game.
The Treasury Zone
The treasury (gold ingot icon) provides one repeatable action in several 'flavors'.
The location enables the four treasury cards (buttons), featured in a row just under the market deck and cards. Here, players can trade coins or favor for gold or silver.
Treasury Zone Action
Action: Buy Metals: Click on a treasury card to deduct the depicted coin or favor amount and load the depicted metal.
Important to note:
- This action is repeatable but can only be performed twice per turn. While this limitation might seem superfluous given the cargo capacity, it is to prevent a specialist ability exploit.
- The coins for metal cards tend to get more expensive as the game progresses, so even if the favor for metal seems unreasonable by comparison, it might eventually become a viable option.
- Metal supplies are limited as well (available up to the player count plus one). The appropriate action may also become unavailable if all metals of that type are currently in players' cargo holds.
The Temple Zone
The temple (initially a dark blue edifice icon) is the focal point of the game. Here, players can donate metals for points and commodities for variable amounts of points and favor.
The location enables the actions depicted in the bottom left area. There are two buttons for donating metal, one for donating commodities, and one for upgrading your cargo. Tucked in the bottom left corner, a rectangular donations reference area keeps track of all the donated metals in the game.
Temple Zone Actions
Action: Upgrade Cargo: Click on the bottom upgrade cargo button to spend 2 coins and increase your cargo capacity by 1. This action is limited, and can only be performed twice in the entire game (you can only increase cargo to 4).
Action: Donate commodities: Click to remove the required commodities from your cargo and receive the amount of VP and favor depicted. Clicking will also shift the market cards.
Action: Donate Metal: Click on the gold for VP or silver for VP button to remove the appropriate metal from your cargo and gain the associated VP. This action is repeatable, but two conditions are checked each time:
- If the donation completed a column (3 metals) in the donations reference area but hasn't filled it, the prices of metal in coins will increase by 0-2 coins.
- If the donation has filled the donations reference area, the temple construction is complete, and the game ends immediately.
Important to note:
- The commodity donation card in the temple area is a direct reference to a market card. One of the three market slots features a small blue temple icon (above the market card). That is the card being mirrored in the temple area. Whenever the market shifts, the card that ends up under the temple icon will immediately be referenced in the temple area.
- Even with the metal price increase, silver will always remain cheaper than gold, at roughly half the cost.
Specialists
Most of the specialists that players can select at the beginning of the game will break the rules in some way or another. Consult their descriptions to familiarize yourself with their potential play style.
Two-player games
When starting a game with two players, a third ship (white) will spawn in the market's zone. This ship also has an influence die, and may block your movement like any other player ship (trimming its value on failed attempts).
When a player manages to enter the neutral ship's zone, her turn is paused, gaining control of the neutral ship figure.
While controlling the neutral ship, the player must move it once or twice according to the regular movement rules, as if it had spent favor. After movement, the player must conclude the rival's turn by either:
- a) clicking the bespoke anchor icon next to its card or,
- b) if the ship ended movement at the market zone -- clicking the market card button on the rival card to shift the market; Then, in either case:
- The neutral ship will roll its influence die
- The player will regain control of her turn
Important to note:
- A player cannot enter the zone containing the neutral ship again after having controlled it on the same turn. It will appear as restricted.